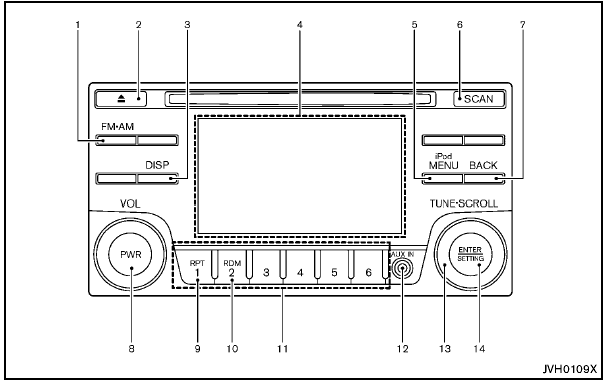
FM-AM-SAT(if so equipped) radio with Compact Disc (CD) player (Type A)
FM-AM-SAT(if so equipped) radio with Compact Disc
(CD) player (Type A)
1. FM·AM band select button
2. CD EJECT button
3. DISP (display) button
4. Color display
5. iPod® MENU button
6. Radio SCAN tuning button
7. BACK button
8. PWR (power) button/VOL (volume) control knob
9. RPT (repeat) play button
10. RDM (random) play button
11. Radio station preset select buttons
12. AUX IN jack
13. TUNE·SCROLL control knob
14. ENTER/SETTING button
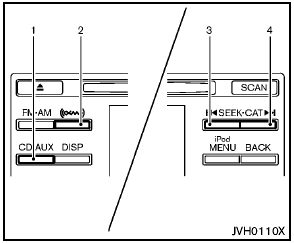
models with satellite radio
1. CD·AUX button
2. XM band select button
3. Radio CAT (category)/REW (rewind) button for
SEEK/TRACK
4. Radio CAT (category)/FF (fast forward) button for
SEEK/TRACK
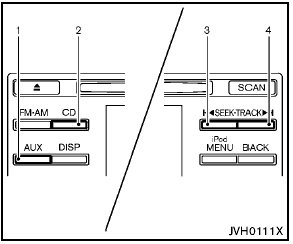
models without satellite radio
1. AUX button
2. CD button
3. REW (rewind) button for SEEK/TRACK
4. FF (fast forward) button for SEEK/TRACK
For all operation precautions, see “Audio operation precautions” earlier in this section.
For models with satellite radio:
- No satellite radio reception is available when
the SAT band option is selected unless the
optional satellite receiver and antenna are
installed, and there is an active XM Satellite
Radio subscription.
- The satellite radio mode requires an active XM Satellite Radio subscription. The satellite radio is not available in Alaska, Hawaii and Guam.
- It may take some time to receive the activation signal after subscribing the XM Satellite Radio. After receiving the activation signal, an available channel list will be automatically updated in the radio. For XM, place the ignition switch from LOCK to ACC to update the channel list.
See also:
Stylized & Small
The Juke's face is hard to characterize. Fang-shaped parking lamps sit atop
the hood; the portals below them appear to have fog lights, but they're actually
the headlights. The grille meanders abo ...
Pulling a stuck vehicle
Front
Rear
To avoid vehicle damage, serious personal
injury or death when recovering a
stuck vehicle.
● Contact a professional towing service
to recover the vehicle if you have ...
Interior light
Interior light
The interior light has a three-position switch and
operates regardless of ignition switch position.
When the switch is in the ON position 1 , the
interior light illuminates, reg ...