Forward-facing child restraint installation using LATCH
Refer to all Warnings and Cautions in the “Child Safety” and “Child Restraint” sections before installing a child restraint.
Follow these steps to install a forward-facing child restraint using the LATCH system:
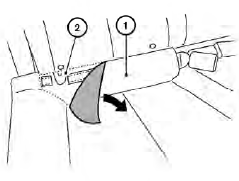
1. If the rear seat cushion has a flap 1 , pull the flap down to allow access to the anchors 2 .
2. Position the child restraint on the seat. Always follow the child restraint manufacturer’s instructions.
Forward-facing web-mounted – step 3
Forward-facing rigid-mounted – step 3
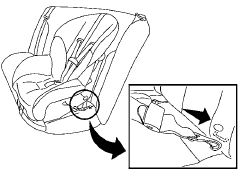
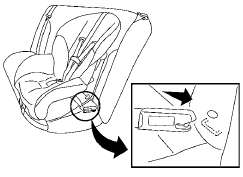
3. Secure the child restraint anchor attachments to the LATCH lower anchors. Check to make sure the LATCH attachment is properly attached to the lower anchors.
If the child restraint is equipped with a top tether strap, route the top tether strap and secure the tether strap to the tether anchor point. See “Installing top tether strap” in this section. Do not install child restraints that require the use of a top tether strap in seating positions that do not have a top tether anchor.
4. The back of the child restraint should be secured against the vehicle seatback. If the seating position does not have an adjustable head restraint and it is interfering with the proper child restraint fit, try another seating position or a different child restraint.

Forward-facing – step 5
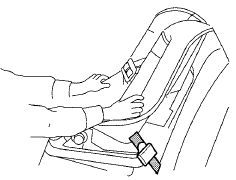
5. For child restraints that are equipped with webbing-mounted attachments, remove any additional slack from the anchor attachments. Press downward and rearward firmly in the center of the child restraint with your knee to compress the vehicle seat cushion and seatback while tightening the webbing of the anchor attachments.
6. Tighten the tether strap according to the manufacturer’s instructions to remove any slack.
Forward-facing – step 7
7. After attaching the child restraint, test it before you place the child in it. Push it from side to side while holding the child restraint near the LATCH attachment path. The child restraint should not move more than 1 inch (25 mm), from side to side. Try to tug it forward and check to see if the LATCH attachment holds the restraint in place. If the restraint is not secure, tighten the LATCH attachment as necessary, or put the restraint in another seat and test it again. You may need to try a different child restraint. Not all child restraints fit in all types of vehicles.
8. Check to make sure the child restraint is properly secured prior to each use. If the child restraint is loose, repeat steps 2 through 7.
See also:
Tire and Loading Information label
1 Seating capacity: The maximum number
of occupants that can be seated in the
vehicle.
2 Vehicle load limit: See “Vehicle loading
information” in the “9. Technical and
consumer inform ...
Sunglasses holder
To open the sunglasses holder, push and release.
Only store one pair of sunglasses in the holder.
WARNING
Keep the sunglasses holder closed while
driving to prevent an accident.
CAUTION
● ...
EXTERIOR
The 2010 Pathfinder is unapologetically boxy. It could have been built with
giant Duplo blocks. However, it's not bad-looking. It's tough, strong and
doesn't fool around. This is a truck that mean ...