Inside mirror
Inside mirror
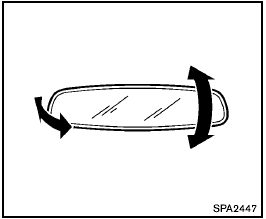
Adjust the height and the angle of the inside mirror to the desired position.

Manual anti-glare type
The night position 1 will reduce glare from the headlights of vehicles behind you at night.
Use the day position 2 when driving in daylight hours.

Use the night position only when necessary, because it reduces rear view clarity.
Automatic anti-glare type
The inside mirror is designed so that it automatically changes reflection according to the intensity of the headlights of the following vehicle.
The anti-glare system will be automatically turned on when the ignition switch is turned to the ON position.
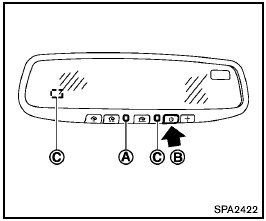
Type A:
When the system is turned on, the indicator light A will illuminate and excessive glare from the headlights of the vehicle behind you will be reduced.
Push the  switch B to make the
inside
rearview mirror operate normally and the indicator
light will turn off. Push the
switch B to make the
inside
rearview mirror operate normally and the indicator
light will turn off. Push the  switch
again to turn the system on.
switch
again to turn the system on.
Do not allow any object to cover the sensors C or apply glass cleaner on them. Doing so will reduce the sensitivity of the sensors, resulting in improper operation.
For the compass operation, see “Compass” in the “2. Instruments and controls” section.
For the HomeLink® Universal Transceiver operation, see “HomeLink® Universal Transceiver” in the “2. Instruments and controls” section.
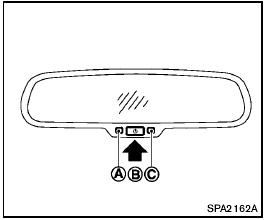
Type B:
When the system is turned on, the indicator light A will illuminate and excessive glare from the headlights of the vehicle behind you will be reduced.
Push the
switch B for 3 seconds to make
the inside mirror operate normally and the
indicator light will turn off. Push the
switch
again for 3 seconds to turn the system on.
Do not hang any objects on the mirror or apply glass cleaner. Doing so will reduce the sensitivity of the sensor C , resulting in improper operation.
See also:
Vehicle Overview
Nissan has the longest history in the U.S. among import automakers selling
compact and midsize pickup trucks. 2009 marks the 50th anniversary of Nissan's
arrival in the U.S. with its Datsun 1000 g ...
Installing top tether strap
Installing top tether strap
First secure the child restraint with the LATCH
system (rear outboard seating positions only) or
the seat belt as applicable.
1. Remove the anchor cover from the an ...
Battery
If the battery is not fully charged during
extremely cold weather conditions, the battery
fluid may freeze and damage the battery. To
maintain maximum efficiency, the battery should
be checked ...