Installing front license plate
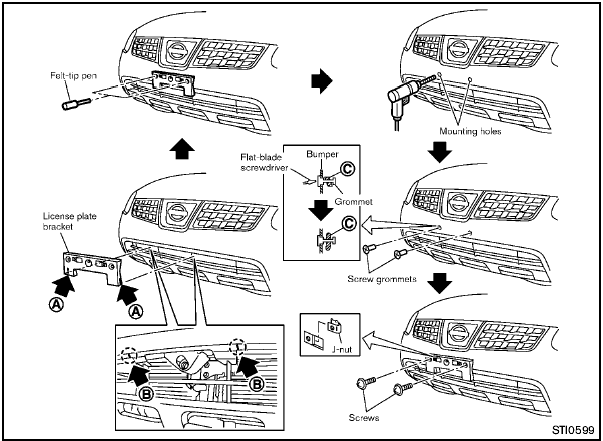
Use the following steps to mount the license
plate:
Before mounting the license plate, confirm that
the following parts are enclosed in the plastic
bag.
- License plate bracket
- J-nut 6 2
- Screw 6 2
- Screw grommet 6 2
1. Temporarily place the license plate bracket by aligning the lower part A of it with the lines B on the bumper.
2. Mark the pilot hole points with a felt-tip pen through the holes of the license plate bracket.
3. Remove the license plate bracket.
4. Carefully drill two pilot holes using a 0.39 in
(10 mm) drill bit at the marked locations. (Be
sure that the drill only goes through the
fascia, or damage to the nut may
occur.)
5. Insert grommets into the hole on the fascia.
6. Insert a flat-blade screwdriver into the grommet hole to add 908 turn onto the part C .
7. Insert a J-nut into the license plate bracket before placing the license plate bracket on the fascia.
8. Install the license plate bracket with screws.
9. Install the license plate with bolts that are no longer than 0.55 in (14 mm).
See also:
Speaker Adaptation function
The Voice Recognition system has a function to
learn the users voice for better voice recognition
performance. The system can memorize the
voices of up to three persons.
Having the system lea ...
How to use the remote keyless entry
function
The remote keyless entry function can operate all
door locks using the remote keyless function of
the Intelligent Key. The remote keyless function
can operate at a distance of 33 ft (10 m) away
fr ...