FM/AM/SAT radio with CD/DVD player (if so equipped)
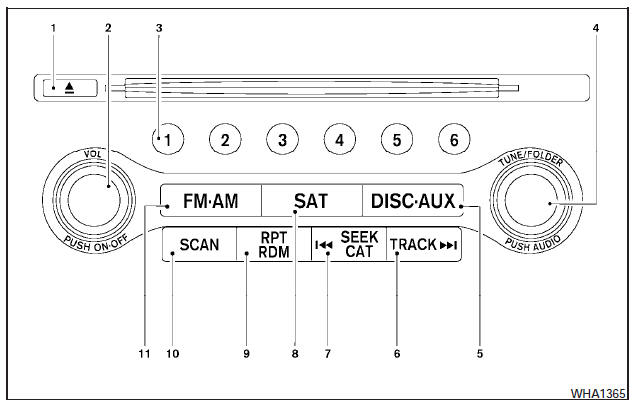
1. CD eject button.
2. VOL/ON·OFF control knob.
3. Station select (1 - 6) buttons.
4. TUNE/FOLDER and AUDIO control knob (Bass, Treble, Fade and Balance).
5. DISC·AUX button.
6. TRACK button.
7. SEEK/CAT button.
8. SAT* button.
9. RPT/RDM button.
10. SCAN button.
11. FM·AM button.
*No satellite radio reception is available when the SAT button is pressed to access satellite radio stations unless optional satellite receiver and antenna are installed and an XMT satellite radio service subscription is active. Satellite radio is not available in Alaska, Hawaii and Guam.
For all operation precautions, see Audio operation precautions in this section.
Audio main operation
VOL/ON·OFF control:
Place the ignition switch in the ACC or ON position and push the VOL/ON·OFF control knob while the system is off to call up the mode that was playing immediately before the system was turned off.
To turn the system off, press the VOL/ON·OFF control knob.
Turn the VOL/ON·OFF control knob to adjust the volume.
This vehicle has Speed Sensitive Volume (SSV) for audio. The audio volume changes as the driving speed changes.
AUDIO control knob (Bass, Treble, Balance and Fade):
Press the AUDIO control knob to change the mode as follows:
Bass > Treble > Balance > Fade To adjust Bass, Treble, Balance and Fade, press the AUDIO control knob until the desired mode appears in the display. Turn the tuning knob to adjust Bass and Treble to the desired level. You can also use the tuning knob to adjust Fade and Balance modes. Fade adjusts the sound level between the front and rear speakers and Balance adjusts the sound between the right and left speakers.
Once you have adjusted the sound quality to the desired level, press the AUDIO control knob repeatedly until the radio or CD display reappears.
If the control knob is not pressed for approximately 10 seconds, the radio or CD display will automatically reappear.
Speed Sensitive Volume (SSV):
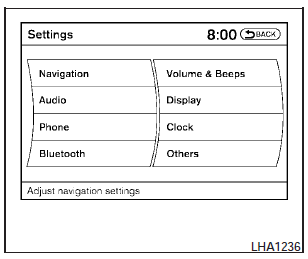
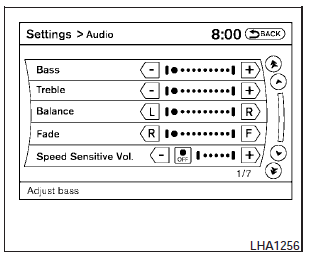
To change the SSV mode from OFF to 5, press the SETTING button. Then select the Audio key using the NISSAN controller, then press the ENTER button; the audio settings screen will be displayed. Select the key or + key to change the SSV.
While in this screen you can also adjust the other audio settings by selecting the corresponding key.
Once you have adjusted the sound quality to the desired level, press the BACK button.
For information on how to use the NISSAN controller, see How to use the NISSAN controller in this section.
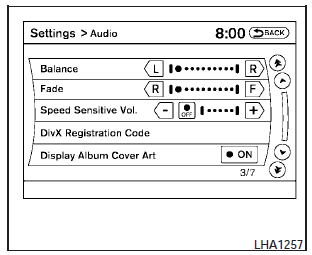
Display album cover art:
When in a audio source encoded with album cover art is played, the album cover art can be displayed on the screen. To toggle this feature on or off, touch the Display Album Cover Art key.
When the feature is activated, the amber indicator next to the word ON will illuminate.

CD, DVD or USB with compressed audio
files
While listening to a CD or compressed audio files, certain text might be able to be displayed (when CD encoded with text is being used).
Depending on how the CD or compressed audio files are encoded, the following text might be displayed:
- Folder displays the name of the current folder being accessed.
- File displays the name of the file currently playing.
- Song displays the ID3 encoded tag of the song name.
- Album displays the ID3 encoded tag of the album name.
- Artist displays the ID3 encoded tag of the artists name.
Some of this text might not display while playing a regular CD.
FM/AM/SAT radio operation
FM/AM band select:
Pressing the FM·AM button will change the band as follows:
AM > FM1 > FM2 > AM When the FM·AM button is pressed while the ignition switch is in the ACC or ON position, the radio will come on at the station last played.
The last station played will also come on when the VOL/ON·OFF control knob is pressed ON.
If a compact disc is playing when the FM·AM button is pressed, the compact disc will automatically be turned off and the last radio station played will come on.
The FM stereo indicator STEREO will illuminate during FM stereo reception. When the stereo broadcast signal is weak, the radio will automatically change from stereo to monaural reception.
SAT band select:
Pressing the SAT button will change the band as follows:
XM1* > XM2* > XM3* > XM1 (satellite, if so equipped) When the SAT button is pressed while the ignition switch is in the ACC or ON position, the radio will come on at the station last played.
The last station played will also come on when the VOL/ON·OFF control knob is pressed ON.
*When the SAT button is pressed, the satellite radio reception will not be available unless an optional satellite receiver and antenna are installed and an XMT satellite radio service subscription is active. Satellite radio is not available in Alaska, Hawaii and Guam.
If a compact disc is playing when the SAT button is pressed, the compact disc will automatically be turned off and the last radio station played will come on.
TUNE/FOLDER (Tuning) knob:
To manually tune the radio, turn the TUNE/FOLDER knob to the right or left.
 SEEK/CAT and TRACK
tuning buttons:
SEEK/CAT and TRACK
tuning buttons:
For AM or FM:
Press the SEEK/CAT  button or
the
TRACK
button or
the
TRACK  button to tune from
high to low or
low to high frequencies and stop at the next
broadcasting station.
button to tune from
high to low or
low to high frequencies and stop at the next
broadcasting station.
For XM:
Press the SEEK/CAT  button or
the
TRACK
button or
the
TRACK  button to go to the
first channel of
the previous or next category.
button to go to the
first channel of
the previous or next category.
SCAN tuning:
Press the SCAN button to stop at each broadcasting station for 5 seconds. Pressing the SCAN button again during this five second period will stop scan tuning and the radio will remain tuned to that station. If the SCAN button is not pressed within 5 seconds, scan tuning moves to the next station.
1 to 6 Station memory operations:
Six stations can be set for the AM band. Twelve stations can be set for the FM band (6 for FM1, 6 for FM2). Eighteen channels can be set for the SAT radio (6 for XM1, 6 for XM2, 6 for XM3 if so equipped).
1. Choose the radio band AM, FM1 or FM2 using the FM·AM select button, or choose the satellite band XM1, XM2 or XM3 using the SAT button.
2. Tune to the desired station using manual, SEEK or SCAN tuning. Press and hold any of the desired station memory buttons (1 6) until the preset number is updated on the display and the sound is briefly muted.
3. The channel indicator will then come on and the sound will resume. Programming is now complete.
4. Other buttons can be set in the same manner.
If the battery cable is disconnected, or if the fuse opens, the radio memory will be canceled. In that case, reset the desired stations.
List (AM and FM)
Select the List key using the NISSAN controller or touchscreen to see a list of the presets in the AM, FM1 or FM2 preset banks.
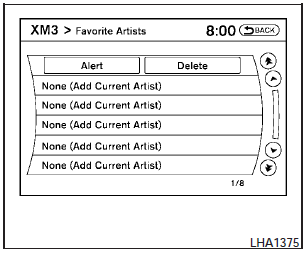
Menu (XM, if so equipped)
Select the Menukey using the NISSAN controller or touchscreen to see a list of options:
- Preset List Displays the list of presets.
Press and hold the touchscreen or ENTER button on the NISSAN controller to save a preset.
- Customize Channel List deselect channels to skip while using the TUNE/FOLDER knob.
- Favorite Artist & Songs Tags the current artist or song playing on XM as a favorite.
Turn the Alert ON to indicate whenever a favorite artist or song is playing on XM.
The audio system must be playing XM radio for this feature to work.
Delete a favorite artist or song.
- Categories Displays a category list for XM radio. Select a category to select the first channel for that category.
- Direct Tune Tune to a channel by entering the channel number.
Radio data system (RDS):
RDS stands for Radio Data System, and is a data information service transmitted by some radio stations on the FM band (not AM band). Currently, most RDS stations are in large cities, but many stations are now considering broadcasting RDS data.
RDS can display:
- Station call sign, such as WHFR 98.3.
- Station name, such as The Groove.
- Music or programming type such as Classical , Country, or Rock.
- Station specific text.
If the station broadcasts RDS information, the text information is automatically displayed.
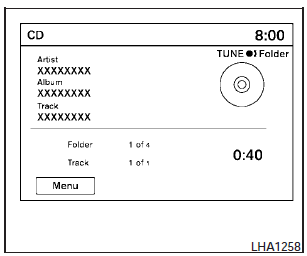
Compact disc (CD) player operation
Place the ignition in the ACC or ON position and insert the compact disc into the slot with the label side facing up. The compact disc will be guided automatically into the slot and start playing.
If the radio is already operating, it will automatically turn off and the compact disc will play.
If the system has been turned off while the compact disc was playing, pressing the VOL/ON·OFF control knob will start the compact disc.
DISC·AUX button:
When the DISC·AUX button is pressed with the system off and the compact disc loaded, the system will turn on and the compact disc will start to play.
When the DISC·AUX button is pressed with the compact disc loaded but the radio playing, the radio will automatically be turned off and the compact disc will start to play.
SEEK/CAT and TRACK buttons:
When the SEEK/CAT  button
is pressed
while a compact disc is playing, the track being
played returns to its beginning. Press several
times to skip back through tracks. The compact
disc will go back the number of times the button
is pressed.
button
is pressed
while a compact disc is playing, the track being
played returns to its beginning. Press several
times to skip back through tracks. The compact
disc will go back the number of times the button
is pressed.
When the TRACK  button is
pressed while
the compact disc is playing, the next track will
start to play from its beginning. Press several
times to skip through tracks. The compact disc
will advance the number of times the button is
pressed. (When the last track on the compact
disc is skipped through, the first track will be
played.)
The NISSAN controller can also be used to select
tracks when a CD is being played.
button is
pressed while
the compact disc is playing, the next track will
start to play from its beginning. Press several
times to skip through tracks. The compact disc
will advance the number of times the button is
pressed. (When the last track on the compact
disc is skipped through, the first track will be
played.)
The NISSAN controller can also be used to select
tracks when a CD is being played.
 SEEK/CAT and TRACK
(Rewind and Fast Forward)
buttons:
SEEK/CAT and TRACK
(Rewind and Fast Forward)
buttons:
Press and hold the  SEEK/CAT
(rewind)
button or the TRACK
SEEK/CAT
(rewind)
button or the TRACK  (fast
forward) button
while a compact disc is playing; the compact disc
will play while rewinding or fast forwarding. When
the button is released, the compact disc will
return to normal play speed.
(fast
forward) button
while a compact disc is playing; the compact disc
will play while rewinding or fast forwarding. When
the button is released, the compact disc will
return to normal play speed.
TUNE/FOLDER knob
While playing a CD with compressed audio files, turn the TUNE/FOLDER knob right or left to play the next or previous folder.
CD menu
Touch the Menu key on the display while a CD or CD with compressed audio files is playing to bring up a list of options. Depending on the type of CD being played, the following options may be available:
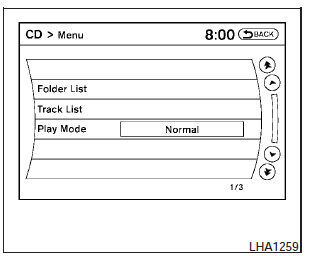
c Play Mode
This option allows you to alter the play pattern of the CD. Touch the key of the mode you wish to apply. The modes change the play pattern as follows:
1 Track Repeat - the current track is repeated.
1 Disc Random- tracks from the entire disc are played randomly.
1 Folder Repeat (compressed audio files CD only) - the current folder is repeated.
1 Folder Random (compressed audio files CD only) - tracks from the current folder are played randomly.
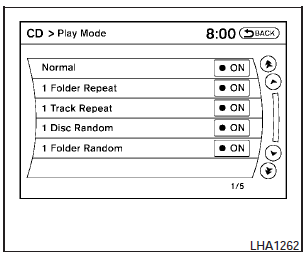
Normal - Plays all tracks on the CD in sequential order until stopped.
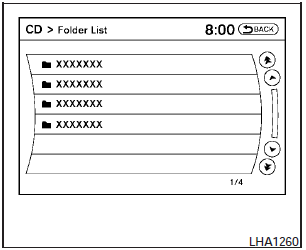
c Folder List
The folders on the disc are displayed. Select the key of a folder name to begin playing tracks from that folder.
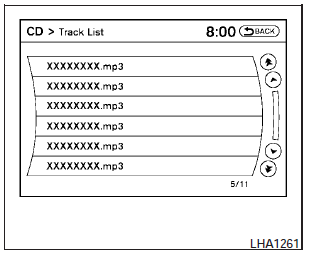
c Track List
The tracks on the disc are displayed. Select the key of a track name to begin playing that track.
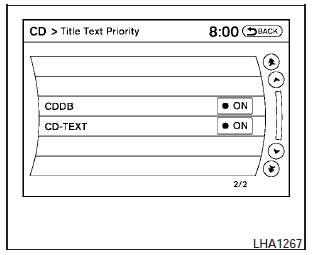
c Title Text Priority
- Record to Music Box, Automatic Recording,
Recording Quality
For more information about these options, see Music Box? Hard-Drive Audio System with Navigation System in this section.
 CD EJECT button:
When the  button is pressed
with the compact
disc loaded, the compact disc will be
ejected.
button is pressed
with the compact
disc loaded, the compact disc will be
ejected.
When the  button is pressed
while the
compact disc is being played, the compact disc
will eject and the system will turn off.
button is pressed
while the
compact disc is being played, the compact disc
will eject and the system will turn off.
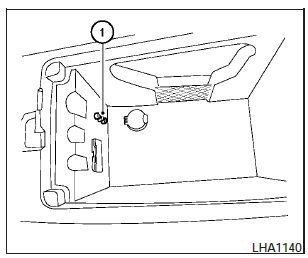
AUX (auxiliary) input jacks
The auxiliary input jacks are located inside the center console (1) . NTSC compatible devices such as video games, camcorders and portable video players can be connected to the auxiliary input jacks. Audio devices, such as some MP3 players, can also be connected to the system through the auxiliary input jacks.
The auxiliary input jacks are color coded for identification purposes:
- Red right channel audio input.
- White left channel audio input.
- Yellow video input.
Before connecting a device to the auxiliary input jacks, turn off the power of the portable device.
With a compatible device connected to the auxiliary input jacks, press the DISC·AUX button repeatedly until the AUX mode appears in the display. The output from the device will be played through the display (when the vehicle is in the (P) Park position and the parking brake engaged) and audio system.
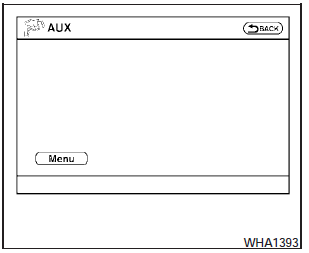

AUX settings
See also:
Hitch ball
Choose a hitch ball of the proper size and weight
rating for your trailer:
● The required hitch ball size is stamped on
most trailer couplers. Most hitch balls also
have the size printed on ...
Checking engine oil level
1. Park the vehicle on a level surface and apply
the parking brake.
2. Run the engine until it reaches operating
temperature.
3. Turn off the engine. Wait more than 10
minutes for the oil to ...
Vehicle Dynamic Control (VDC) system
The Vehicle Dynamic Control (VDC) system uses
various sensors to monitor driver inputs and vehicle
motion. Under certain driving situations, the
system will control braking and engine output to ...