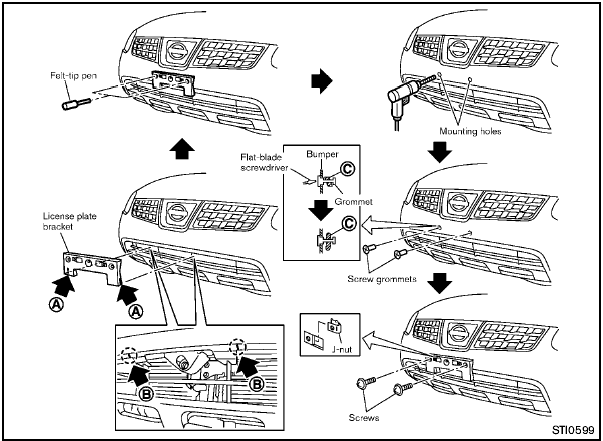
Installing front license plate

Use the following steps to mount the license
plate:
Before mounting the license plate, confirm that
the following parts are enclosed in the plastic
bag.
- License plate bracket
- J-nut 6 2
- Screw 6 2
- Screw grommet 6 2
1. Temporarily place the license plate bracket by aligning the lower part A of it with the lines B on the bumper.
2. Mark the pilot hole points with a felt-tip pen through the holes of the license plate bracket.
3. Remove the license plate bracket.
4. Carefully drill two pilot holes using a 0.39 in
(10 mm) drill bit at the marked locations. (Be
sure that the drill only goes through the
fascia, or damage to the nut may
occur.)
5. Insert grommets into the hole on the fascia.
6. Insert a flat-blade screwdriver into the grommet hole to add 908 turn onto the part C .
7. Insert a J-nut into the license plate bracket before placing the license plate bracket on the fascia.
8. Install the license plate bracket with screws.
9. Install the license plate with bolts that are no longer than 0.55 in (14 mm).
See also:
Exterior rear
1. Trunk lid
2. Vehicle loading
3. Interior trunk lid release
4. Rear window defroster switch
5. Child safety locks
6. Fuel-filler door
7. Fuel-filler cap, fuel recommendation
8. Repla ...
Types of tires
● When changing or replacing tires, be
sure all four tires are of the same type
(i.e., Summer, All Season or Snow) and
construction. A NISSAN dealer may be
able to help you with info ...
Satellite radio reception (if so equipped)
When the satellite radio is used for the first time
or the battery has been replaced, the satellite
radio may not work properly. This is not a malfunction.
Wait more than 10 minutes with satellite
...
