
Installing the spare tire
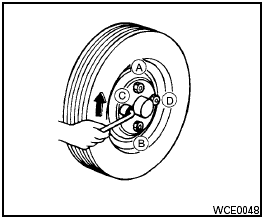
Installing the spare tire
The spare tire is designed for emergency use. See specific instructions under the heading “Wheels and tires” in the “Maintenance and do-it-yourself” section of this manual.
1. Clean any mud or dirt from the surface between the wheel and hub.
2. Carefully put the spare tire on and tighten the wheel nuts finger tight.
3. With the wheel nut wrench, tighten wheel nuts alternately and evenly as illustrated until they are tight.
4. Lower the vehicle slowly until the tire touches the ground. Then, with the wheel nut wrench, tighten the wheel nuts securely in the sequence illustrated ( A , B , C , D ).
Lower the vehicle completely.

● Incorrect wheel nuts or improperly tightened wheel nuts can cause the wheel to become loose or come off.
This could cause an accident.
● Do not use oil or grease on the wheel studs or nuts. This could cause the nuts to become loose.
● Retighten the wheel nuts when the vehicle has been driven for 600 miles (1,000 km) (also in cases of a flat tire, etc.).
As soon as possible, tighten the wheel nuts to the specified torque with a torque wrench.
Wheel nut tightening torque.
83 ft-lb (113 N·m)
The wheel nuts must be kept tightened to specification at all times. It is recommended that wheel nuts be tightened to specification at each lubrication interval.
Adjust tire pressure to the COLD pressure.
COLD pressure: After vehicle has been parked for three hours or more or driven less than 1 mile (1.6 km).
COLD tire pressures are shown on the Tire and Loading Information Label.
5. Securely store the flat tire in the vehicle.
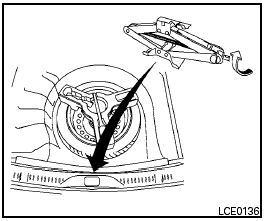
6. Install the jack in its storage area and tighten the jack screw clockwise.
7. Place the spare tire cover and the trunk floor carpeting over the damaged tire.
8. Close the trunk.
● Always make sure that the spare tire and jacking equipment are properly secured after use. Such items can become dangerous projectiles in an accident or sudden stop.
● The spare tire is designed for emergency use. See specific instructions under the heading “Wheels and tires” in the “Maintenance and do-it-yourself” section of this manual.
See also:
Fuel recommendation
Use unleaded regular gasoline with an octane
rating of at least 87 AKI (Anti-Knock Index)
number (Research octane number 91).
- Using a fuel other than that specified
could adversely affect ...
Bluetooth streaming audio (if so
equipped)
● Some Bluetooth audio devices may not be
recognized by the in-vehicle audio system.
● It is necessary to set up the wireless connection
between a compatible Bluetooth
audio device an ...
California proposition 65 warning
Engine exhaust, some of its constituents,
and certain vehicle components
contain or emit chemicals known to the
State of California to cause cancer and
birth defects or other reproductive ...