Installing front license plate
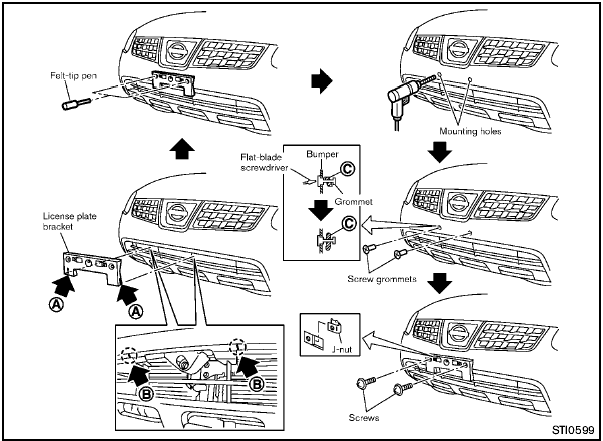
Use the following steps to mount the license
plate:
Before mounting the license plate, confirm that
the following parts are enclosed in the plastic
bag.
- License plate bracket
- J-nut 6 2
- Screw 6 2
- Screw grommet 6 2
1. Temporarily place the license plate bracket by aligning the lower part A of it with the lines B on the bumper.
2. Mark the pilot hole points with a felt-tip pen through the holes of the license plate bracket.
3. Remove the license plate bracket.
4. Carefully drill two pilot holes using a 0.39 in
(10 mm) drill bit at the marked locations. (Be
sure that the drill only goes through the
fascia, or damage to the nut may
occur.)
5. Insert grommets into the hole on the fascia.
6. Insert a flat-blade screwdriver into the grommet hole to add 908 turn onto the part C .
7. Insert a J-nut into the license plate bracket before placing the license plate bracket on the fascia.
8. Install the license plate bracket with screws.
9. Install the license plate with bolts that are no longer than 0.55 in (14 mm).
See also:
In-cabin microfilter
The in-cabin microfilter restricts the entry of airborne
dust and pollen particles and reduces
some objectionable outside odors. The filter is
located behind the glove box. Refer to the
NISSAN ...
Tire and loading information label
The cold tire pressure is shown on the Tire and
Loading Information label affixed to the pillar as
illustrated. ...
Engine
This spark ignition system complies with the Canadian standard ICES-002. ...