Inside mirror
Inside mirror
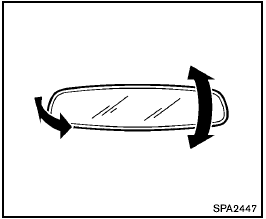
Adjust the height and the angle of the inside mirror to the desired position.
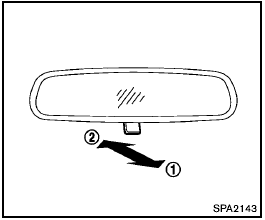
Manual anti-glare type
The night position 1 will reduce glare from the headlights of vehicles behind you at night.
Use the day position 2 when driving in daylight hours.

Use the night position only when necessary, because it reduces rear view clarity.
Automatic anti-glare type
The inside mirror is designed so that it automatically changes reflection according to the intensity of the headlights of the following vehicle.
The anti-glare system will be automatically turned on when the ignition switch is turned to the ON position.
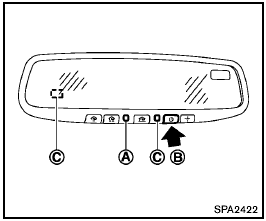
Type A:
When the system is turned on, the indicator light A will illuminate and excessive glare from the headlights of the vehicle behind you will be reduced.
Push the  switch B to make the
inside
rearview mirror operate normally and the indicator
light will turn off. Push the
switch B to make the
inside
rearview mirror operate normally and the indicator
light will turn off. Push the  switch
again to turn the system on.
switch
again to turn the system on.
Do not allow any object to cover the sensors C or apply glass cleaner on them. Doing so will reduce the sensitivity of the sensors, resulting in improper operation.
For the compass operation, see “Compass” in the “2. Instruments and controls” section.
For the HomeLink® Universal Transceiver operation, see “HomeLink® Universal Transceiver” in the “2. Instruments and controls” section.
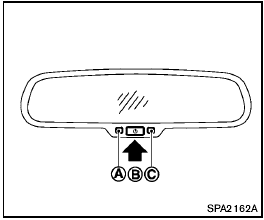
Type B:
When the system is turned on, the indicator light A will illuminate and excessive glare from the headlights of the vehicle behind you will be reduced.
Push the
switch B for 3 seconds to make
the inside mirror operate normally and the
indicator light will turn off. Push the
switch
again for 3 seconds to turn the system on.
Do not hang any objects on the mirror or apply glass cleaner. Doing so will reduce the sensitivity of the sensor C , resulting in improper operation.
See also:
Keys
1. Two Intelligent Keys
2. Mechanical keys (inside Intelligent
Keys)
3. Key number plate ...
Under the Hood
A 3.5-liter V-6 engine sends 245 horsepower to Nissan’s Xtronic CVT, which
has no gears but works with a steel belt and twin pulleys. An available Vehicle
Dynamic Control system improves stabili ...
Air conditioner system refrigerant and oil recommendations
The air conditioner system in your NISSAN
vehicle must be charged with the refrigerant
HFC-134a (R-134a) and NISSAN A/C
system oil Type S or the exact equivalents.
CAUTION:
The use of any othe ...