Clock
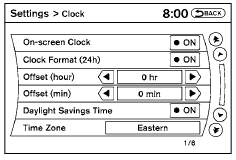
The following display will appear after pressing the SETTING button, then selecting the “Clock” key.
On-screen Clock:
When this item is enabled (indicator light illuminated), a clock is always displayed in the upper right corner of the screen.
This clock will indicate the time almost exactly because it is always adjusted by the GPS system.
Clock Format (24h):
When this item is enabled (indicator light illuminated), the clock format will change from the default 12-hour display to a 24-hour display. Offset (hour):
Adjust the time by increasing or decreasing the hours.
Offset (minute):
Adjust the time by increasing or decreasing the minutes.
Daylight Savings Time:
When this item is enabled (indicator light illuminated), daylight savings time is on. To turn off the daylight savings time, touch the “ON” key; the amber indicator light will go out.
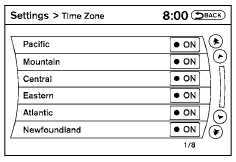
Time Zone:
Select the “Time Zone” key; the Time Zone screen will appear.
Select one of the following zones, depending on the current location, by selecting the correct time zone key to enable that time zone (indicator light will illuminate for that location).
● Pacific
● Mountain
● Central
● Eastern
● Atlantic
● Newfoundland
● Hawaii
● Alaska
After selection/settings, select the “Back” key or any other mode button to accept the changes.
See also:
Tachometer
The tachometer indicates engine speed in revolutions
per minute (rpm). Do not rev engine into
the red zone 1 .
CAUTION
When engine speed approaches the red
zone, shift to a higher gear or reduc ...
Fresh New Exterior, Driver-Oriented Interior
Rogue's exterior is designed to present an image of modern sophistication.
Its dramatic styling includes dynamically arched forms and powerful rear
shoulder lines. The extensive redesign for 2011 ...
Compass display
Press the button when the
ignition switch
is placed in the ON position. The direction will be
displayed. ...