NISSAN Intelligent key battery discharge

If the battery of the Intelligent Key is almost discharged, the guide light (A) of the Intelligent Key port blinks and the indicator appears on the vehicle information display. See Vehicle information display in the Instruments and controls section.
In this case, inserting the Intelligent Key into the port (B)- allows you to start the engine. Make sure the Intelligent Key is placed in the correct direction:
The front side faces upward and the key ring side faces downward as illustrated.
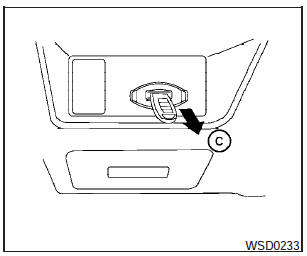
To remove the Intelligent Key from the port, push the ignition switch to the LOCK position and pull the Intelligent Key out of the port (C).
NOTE:
The Intelligent Key port does not charge the Intelligent Key battery. If you see the low battery indicator, replace the battery as soon as possible. See Battery replacement in the Maintenance and do-ityourself section.
CAUTION:
- Never place anything except the Intelligent Key in the Intelligent Key port. Doing so may cause damage to the equipment.
- Make sure the Intelligent Key is in the correct direction when inserting it to the Intelligent Key port. The engine may not start if it is in the wrong direction.
- Remove the Intelligent Key from the Intelligent Key port after the ignition switch is pushed to the LOCK position.
See also:
Removing spots
Remove tar and oil spots, industrial dust, insects,
and tree sap as quickly as possible from the
surface of the paint to avoid lasting damage or
staining. Special cleaning products are available
a ...
Instrument brightness control
The instrument cluster illuminates when the ignition
switch is in the ON position.
The instrument brightness control operates when
the headlight control switch is in the
AUTO, or
position. ...
SAFETY
For the kids, the Juke was fun, too. They loved the way it looked, but there
was a problem with the seat belts. The buckles were too buried in the seat
cushions to make them easy to use for my 6- ...