Installing front license plate
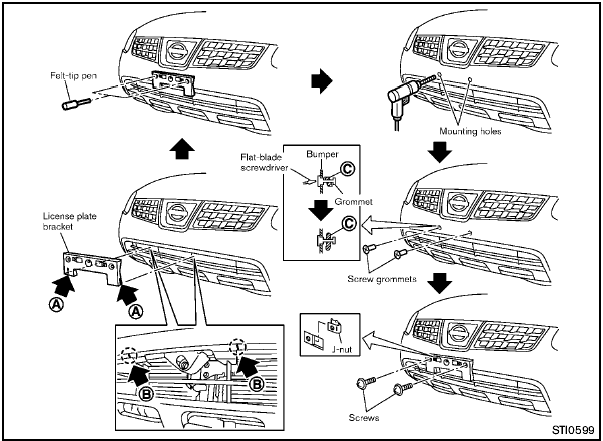
Use the following steps to mount the license
plate:
Before mounting the license plate, confirm that
the following parts are enclosed in the plastic
bag.
- License plate bracket
- J-nut 6 2
- Screw 6 2
- Screw grommet 6 2
1. Temporarily place the license plate bracket by aligning the lower part A of it with the lines B on the bumper.
2. Mark the pilot hole points with a felt-tip pen through the holes of the license plate bracket.
3. Remove the license plate bracket.
4. Carefully drill two pilot holes using a 0.39 in
(10 mm) drill bit at the marked locations. (Be
sure that the drill only goes through the
fascia, or damage to the nut may
occur.)
5. Insert grommets into the hole on the fascia.
6. Insert a flat-blade screwdriver into the grommet hole to add 908 turn onto the part C .
7. Insert a J-nut into the license plate bracket before placing the license plate bracket on the fascia.
8. Install the license plate bracket with screws.
9. Install the license plate with bolts that are no longer than 0.55 in (14 mm).
See also:
Jump starting
To start your engine with a booster battery, the
instructions and precautions below must be followed.
If the battery of a vehicle equipped with the
NISSAN Intelligent Key ™ is discharged, the
...
Changing engine oil filter
QR25DE
1. Park the vehicle on a level surface and apply
the parking brake.
2. Turn the engine off.
3. Place a large drain pan under the oil filter A .
4. Loosen the oil filter A with an oil fil ...
Most common factors contributing to vehicle corrosion
- The accumulation of moisture-retaining dirt
and debris in body panel sections, cavities,
and other areas.
- Damage to paint and other protective coatings
caused by gravel and stone chips or
...