Checking engine oil level

1. Park the vehicle on a level surface and apply the parking brake.
2. Start the engine and let it idle until it reaches operating temperature.
3. Turn off the engine. Wait more than 10 minutes for the oil to drain back into the oil pan.
4. Remove the dipstick and wipe it clean. Reinsert it all the way.
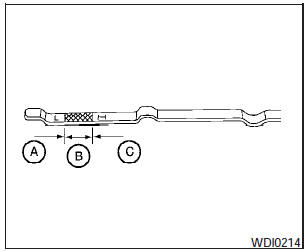
5. Remove the dipstick again and check the oil level. It should be between the H (High) and L (Low) marks (B). This is the normal operating oil level range. If the oil level is below the L (Low) mark (A) , remove the oil filler cap and pour recommended oil through the opening. Do not overfill (C).
6. Recheck oil level with the dipstick.
It is normal to add some oil between oil maintenance intervals or during the break-in period, depending on the severity of operating conditions.
CAUTION:
Oil level should be checked regularly. Operating the engine with an insufficient amount of oil can damage the engine, and such damage is not covered by warranty.
See also:
Infants
Infants up to at least 1 year old should be placed
in a rear-facing child restraint. NISSAN recommends
that infants be placed in child restraints
that comply with Federal Motor Vehicle Safety
...
Front power seat adjustment
Coupe
Operating tips
WARNING
Before driving the vehicle, return the seatback
to an upright seating position after
manually releasing it. Also, make sure the
seat is locked in place. Failure ...
Operating tips
To get the best performance out of the NISSAN
Voice Recognition system, observe the following:
● Keep the interior of the vehicle as quiet as
possible. Close the windows to eliminate
surroun ...