



Nissan Versa: In case of emergency - Flat tire
Tire Pressure Monitoring System (TPMS)
Your Nissan Versa is equipped with an advanced Tire Pressure Monitoring System (TPMS). This intelligent system continuously monitors the inflation pressure of all four main road tires, excluding the spare tire.
When the low tire pressure warning light illuminates on your instrument cluster and the warning message "Tire Pressure Low - Add Air" appears clearly in the trip computer display, it indicates that one or more of your tires is significantly under-inflated. If the vehicle is driven with low tire pressure, the TPMS will activate and warn you of the condition. Please note that this system activates only when the vehicle is driven at speeds above 16 mph (25 km/h).
WARNING
- The radio waves emitted by the system could adversely affect certain types of electric medical equipment. Individuals who utilize a cardiac pacemaker should contact their medical equipment manufacturer to discuss potential electromagnetic influences before using or riding in the vehicle.
- If the low tire pressure warning light illuminates while you are driving your Nissan Versa, avoid any sudden steering maneuvers or abrupt, hard braking. Reduce your vehicle speed immediately, safely pull off the road to a secure location, and bring the vehicle to a complete stop as soon as possible.
Driving your vehicle with under-inflated tires may permanently damage the tire internal structure and significantly increase the overall likelihood of sudden tire failure.
Severe vehicle damage could occur as a result, which may lead to a dangerous traffic accident and could result in serious personal injury.
Carefully check the pressure of all four tires using an accurate pressure gauge. Adjust the tire inflation pressure to match the recommended COLD tire pressure specifications shown clearly on the Tire and Loading Information label to turn the low tire pressure warning light OFF. If the warning light continues to illuminate while driving even after you have adjusted the tire pressure correctly, a tire may actually be flat or the TPMS system may be experiencing a malfunction.
If you discover that you have a flat tire, replace it promptly with a spare tire as soon as possible. If no tire is flat and all tires are properly inflated to specification, have your vehicle checked by professionals. It is recommended that you visit an authorized NISSAN dealer for this specialized service.
- When using a replacement wheel that lacks the TPMS sensor—such as a standard spare tire—the TPMS cannot function normally, causing the low tire pressure warning light to flash continuously for approximately 1 minute before remaining solidly lit. Have your damaged tires repaired or replaced and the TPMS system reset as soon as possible. It is recommended that you visit an authorized NISSAN dealer for these professional services.
- Do not inject any temporary tire repair liquids, aerosol tire sealants, or inflator chemicals into the tires, as these substances can cause a permanent malfunction of the sensitive tire pressure sensors.
- Replacing your tires with models or sizes not originally specified and approved by NISSAN could adversely affect the proper operation and accuracy of the TPMS.
Changing a flat tire
If you encounter a flat tire while operating your Nissan Versa, follow the step-by-step instructions outlined below to handle the situation safely:
Stopping the vehicle
1. Safely and carefully maneuver your vehicle completely off the active roadway and well away from fast-moving traffic.
2. Turn on your hazard warning flashers immediately to alert surrounding motorists.
3. Park securely on a flat, level surface and firmly engage the parking brake. If your vehicle is equipped with a manual transmission, shift it into R (Reverse); if it features a Continuously Variable Transmission, shift firmly into P (Park).
4. Turn off the vehicle engine completely.
5. Raise the vehicle hood to signal other traffic and inform professional road assistance personnel that you are parked and require immediate assistance.
6. Have all passengers exit the vehicle safely and stand in a secure area well away from active traffic and completely clear of the vehicle.
WARNING
- Always double-check to make certain that the parking brake is securely and firmly applied, and that the manual transmission is shifted into R (Reverse) or the Continuously Variable Transmission is securely in P (Park).
- Never attempt to change tires when your vehicle is parked on an incline slope, patch of ice, or other slippery surfaces.
Doing so is extremely hazardous and risks vehicle movement.
- Never attempt to change tires yourself if fast-moving oncoming traffic is dangerously close to your stopped vehicle. Stay inside or safely away and wait for professional road assistance.
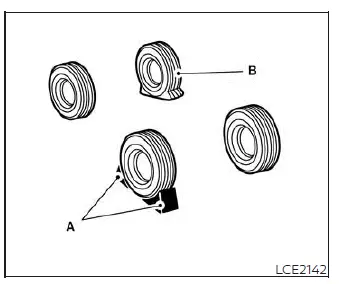
- Blocks
- Flat tire
Blocking wheels
Place suitable wheel blocks or chocks firmly at both the front and the back of the wheel that sits diagonally opposite from the flat tire to ensure your Nissan Versa remains securely anchored and prevents any accidental rolling when it is raised up with the jack.
WARNING
Always make certain to block the designated wheel securely before starting, as an unblocked vehicle may shift unexpectedly and result in severe personal injury.
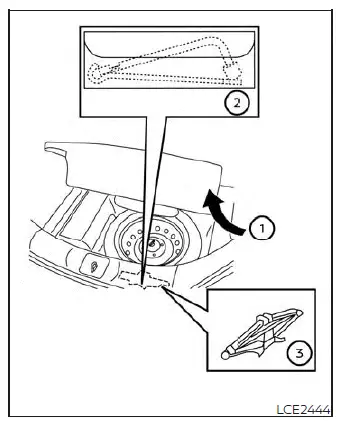
Getting the spare tire and tools
Open the rear trunk compartment of your Nissan Versa. Lift the carpeted floorboard 1 upward to access the cargo sub-floor.
Locate and remove the protective canvas bag containing the metal jacking rod and the wheel nut wrench 2.
To remove the emergency mechanical jack 3, carefully collapse and unthread the jack from its designated factory storage bracket. If necessary for clearance, you can remove the spare tire first to easily reach and lift out the jack.
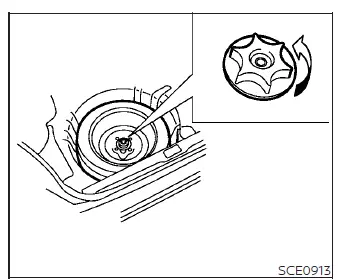
To remove the spare tire from its well, loosen the central retaining bolt by turning it counterclockwise by hand. Once completely free, remove the bolt and lifting bracket, and then lift out the spare tire.
CAUTION
Do not touch exposed floor metal directly with bare skin if the vehicle has been sitting in extreme heat or cold. Doing so could result in skin burns or discomfort.
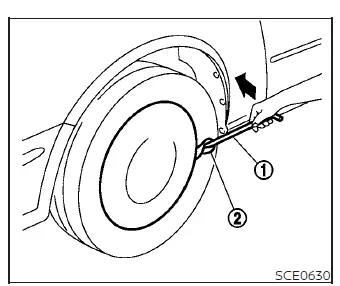
Removing wheel cover (if so equipped)
CAUTION
Never use your bare hands to pry off wheel caps or decorative wheel covers from your Nissan Versa. Doing so is dangerous and could result in personal injury or bruised fingers.
To remove the wheel cover cleanly, insert the flat end of the jacking rod 1 behind the cover rim as illustrated.
Always place a clean piece of cloth 2 between the outer wheel edge and the metal jacking rod to prevent scratching or marring the wheel rim and the decorative wheel cover.
Exercise caution throughout the process to avoid scratching or damaging the exterior finish of the wheel cover and wheel surface.
Jacking up vehicle and removing the damaged tire
WARNING
- Never get underneath your Nissan Versa while it is supported only by the emergency mechanical jack. If it is necessary for any reason to work underneath the vehicle chassis, always support the vehicle securely with professional safety stands (jack stands).
- Use exclusively the designated factory jack provided with your vehicle to lift your Nissan Versa. Never use the emergency jack provided with your vehicle on other vehicle models. The included jack is engineered specifically for lifting only your vehicle during an emergency tire change.
- Always attach the jack to the correct, reinforced jack-up points specified for your model. Never use any other structural part of the vehicle frame for jack support, as this can cause severe body damage.
- Never jack up the vehicle higher than necessary to clear the ground and replace the wheel.
- Never place wooden blocks, bricks, or stones on top of or underneath the lifting jack.
- Do not start or run the engine while your Nissan Versa is elevated on the jack. Engine vibrations may cause the vehicle to shift and slip off the jack. This is especially critical for vehicles equipped with limited-slip differentials.
- Do not allow any passengers to remain seated inside the vehicle while it is raised on the jack.
- Never run the engine or spin a transmission gear when any wheel is lifted completely off the ground, as this movement can cause the vehicle to pull off the jack support.
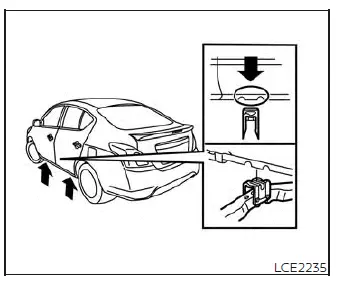
Always refer closely to the proper vehicle manual illustrations to verify the correct placement and exact jack-up points for your specific vehicle model and jack type.
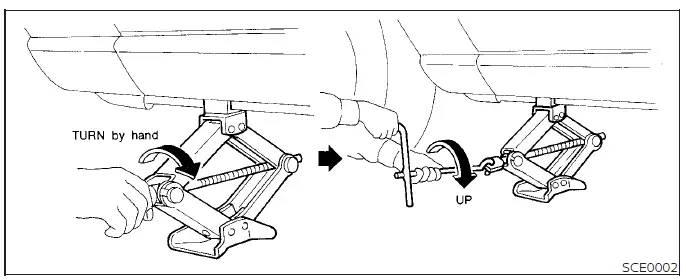
Carefully read the warning and caution label attached directly to the jack body along with the following operating instructions before proceeding.
1. Loosen each wheel nut by 1 or 2 full turns by rotating the wheel nut wrench counterclockwise. Do not completely remove the wheel nuts yet until the damaged tire has been lifted completely off the ground.
2. Place the emergency jack directly underneath the designated vehicle jack-up point as illustrated so that the grooved top of the jack securely contacts the vehicle frame at the exact reinforced jack-up point.
Align the jack head precisely between the two designated notches located along the front or the rear frame seam of your Nissan Versa. Ensure you fit the groove of the mechanical jack head securely right between these notches.
Always ensure the emergency jack is used exclusively on firm, flat, and level ground.
3. To lift your Nissan Versa smoothly, firmly grip the jack lever and rod using both hands. Carefully raise the vehicle until the damaged tire clears the ground completely. Remove the wheel nuts in order, and then slide the flat tire off the wheel hub.
Installing the spare tire
Please note that the included spare tire is engineered and designed strictly for temporary emergency use only.
1. Thoroughly clean any mud, dirt, or debris from the mating surfaces between the replacement wheel and the vehicle hub.
2. Carefully put the spare tire onto the hub mounting studs and thread all the wheel nuts on securely by hand until finger tight.
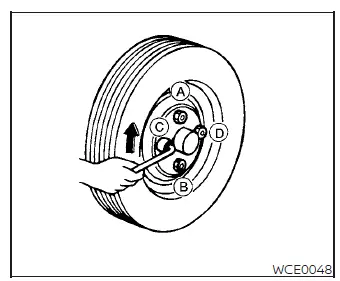
3. Using the wheel nut wrench, tighten the wheel nuts alternately and evenly following the exact cross-pattern sequence illustrated ( A , B , C , D ) until they are snug.
4. Lower your Nissan Versa slowly until the tire makes firm contact with the ground. Then, using the wheel nut wrench, retighten the wheel nuts securely in the exact alternating sequence illustrated ( A , B , C , D ). Lower the vehicle completely to the pavement.
WARNING
- Using incorrect wheel nuts or failing to tighten the wheel nuts properly can cause the wheel to become dangerously loose or detach completely while driving.
This hazardous failure could cause a serious traffic accident.
- Never apply any oil, grease, or lubricants to the wheel studs or wheel nuts. Doing so can cause the nuts to loosen unexpectedly over time.
- Always retighten the wheel nuts once your Nissan Versa has been driven for 600 miles (1,000 km), as well as anytime following an emergency tire change.
As soon as possible, use a calibrated torque wrench to tighten the wheel nuts to the precise manufacturer specification.
Wheel nut tightening torque: 83 ft-lb (113 N·m)
The wheel nuts must be maintained tight to specification at all times. It is recommended that wheel nut torque be checked and tightened to specification during every routine vehicle lubrication and maintenance interval.
Adjust tire pressure precisely to the recommended COLD pressure specification.
COLD pressure definition: Measured after the vehicle has been parked for 3 hours or more, or driven less than 1 mi (1.6 km).
Correct COLD tire pressures are clearly printed on the official Tire and Loading Information Label affixed to your vehicle.
After adjusting the inflation to the COLD tire pressure, the digital display of tire pressure information may show a higher pressure reading after your Nissan Versa has been driven more than 1 mile (1.6 km). This occurs naturally because internal tire air pressure rises as the tire heats up during driving. This behavior does not indicate a system malfunction.
5. Securely store the removed flat tire back inside the cargo floor compartment of your Nissan Versa.
NOTE:
You may need to temporarily remove the decorative wheel cap (if so equipped) to properly secure the damaged tire down using the spare tire mounting clamp.
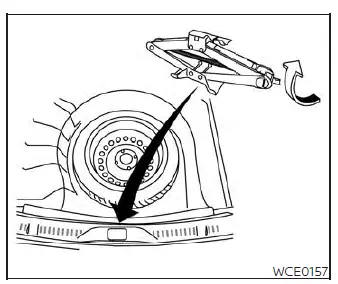
6. Reinstall the mechanical jack securely into its designated factory storage area and tighten the retention jack screw clockwise.
7. Place the spare tire cover lid and the trunk floor carpeting back over the stored flat tire.
8. Close the trunk lid completely.
WARNING
- Always make certain that the spare tire, tools, and jacking equipment are properly and securely stowed after every use. Loose heavy items can transform into dangerous projectiles during a collision or sudden emergency stop.
- The compact spare tire is designed strictly for emergency use and should be replaced with a standard road tire promptly.