Fastening the seat belts

1. Adjust the seat. See “Seats” earlier in this section.
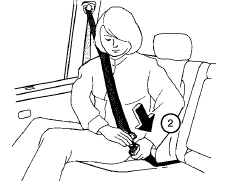
2 Slowly pull the seat belt out of the retractor and insert the tongue into the buckle until you hear and feel the latch engage.
● The retractor is designed to lock during a sudden stop or on impact. A slow pulling motion permits the seat belt to move, and allows you some freedom of movement in the seat.
● If the seat belt cannot be pulled from its fully retracted position, firmly pull the belt and release it. Then smoothly pull the belt out of the retractor.

3 Position the lap belt portion low and snug on the hips as shown.
4 Pull the shoulder belt portion toward the retractor to take up extra slack. Be sure the shoulder belt is routed over your shoulder and across your chest.
The front passenger seat and the rear seating positions’ three-point seat belts have two modes of operation:
● Emergency Locking Retractor (ELR)
● Automatic Locking Retractor (ALR)
The Emergency Locking Retractor (ELR) mode allows the seat belt to extend and retract to allow the driver and passengers some freedom of movement in the seat. The ELR locks the seat belt when the vehicle slows down rapidly or during certain impacts.
The Automatic Locking Retractor (ALR) mode (child restraint mode) locks the seat belt for child restraint installation.
When the ALR mode is activated, the seat belt cannot be extended again until the seat belt tongue is detached from the buckle and fully retracted. The seat belt returns to the ELR mode after the seat belt fully retracts. See “Child restraints” later in this section for more information.
The ALR mode should be used only for child restraint installation. During normal seat belt use by an occupant, the ALR mode should not be activated. If it is activated, it may cause uncomfortable seat belt tension.
WARNING
When fastening the seat belts, be certain that the seatbacks are completely secured in the latched position. If they are not completely secured, passengers may be injured in an accident or sudden stop.
See also:
Precautions when starting and driving
WARNING:
- Do not leave children or adults who
would normally require the assistance
of others alone in your vehicle. Pets
should also not be left alone. They
could accidentally injure themse ...
Adjustable headrest (if so equipped)
The adjustable headrests supplement the
other vehicle safety systems. They may
provide additional protection against injury
in certain rear end collisions. Adjust
the headrests properly, as ...
Сhange the display brightness button
To change the display brightness, press
the
button. Pressing the button again will
change the display to the day or the night display.
If no operation is performed within 5 seconds, the
dis ...