
Rear-facing child restraint installation using LATCH
Refer to all Warnings and Cautions in the “Child safety” and “Child restraints” sections before installing a child restraint.
Follow these steps to install a rear-facing child restraint using the LATCH system:
1. Position the child restraint on the seat.
Always follow the child restraint manufacturer’s instructions.
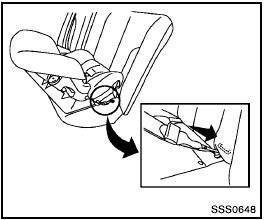
Rear-facing web-mounted — step 2
2. Secure the child restraint anchor attachments to the LATCH lower anchors. Check to make sure the LATCH attachment is properly attached to the lower anchors.
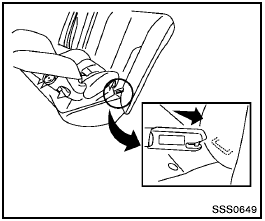
Rear-facing rigid-mounted — step 2
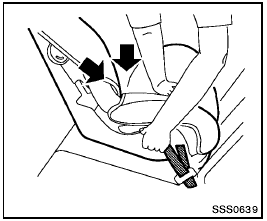
Rear-facing — step 3
3. For child restraints that are equipped with webbing-mounted attachments, remove any additional slack from the anchor attachments.
Press downward and rearward firmly in the center of the child restraint with your hand to compress the vehicle seat cushion and seatback while tightening the webbing of the anchor attachments.
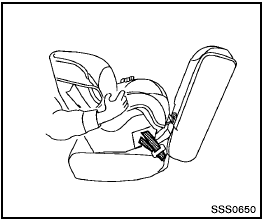
Rear-facing — step 4
4. After attaching the child restraint, test it before you place the child in it. Push it from side to side while holding the child restraint near the LATCH attachment path. The child restraint should not move more than 1 inch (25 mm), from side to side. Try to tug it forward and check to see if the LATCH attachment holds the restraint in place. If the restraint is not secure, tighten the LATCH attachment as necessary, or put the restraint in another seat and test it again. You may need to try a different child restraint or try installing by using the vehicle seat belt (if applicable). Not all child restraints fit in all types of vehicles.
5. Check to make sure the child restraint is properly secured prior to each use. If the child restraint is loose, repeat steps 1 through 4.
See also:
Fuses
Two types of fuses are used. Type A is used in
the fuse boxes in the engine compartment. Type
B is used in the passenger compartment fuse
box.
Type A fuses are provided as spare fuses. They
...
Instrument brightness control
The instrument brightness control operates
when the headlight switch is in the or
position.
Turn the control A to adjust the brightness of
the meter panel and the instrument panel lights.
...
Volume control switch
Push the volume control switch up or down to
increase or decrease the volume.
Tuning
Memory change (radio):
Push the tuning switch ( or
) for less
than 1.5 seconds to change presets.
Seek t ...