Headlights
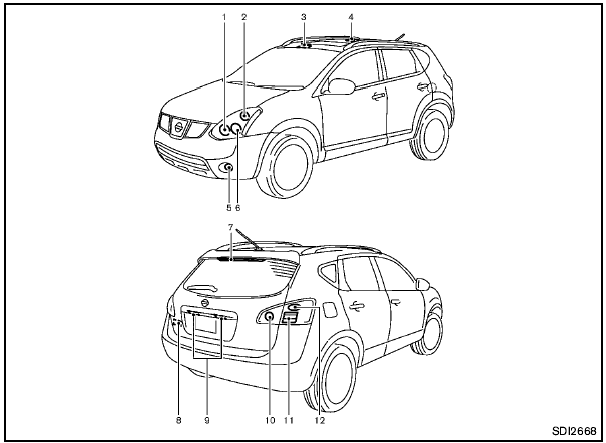
1. Headlight (high-beam)
2. Front turn signal/park/side marker light
3. Front map light
4. Ceiling light
5. Front fog light
6. Headlight (low-beam)
7. High-mounted stop light
8. Cargo light
9. License plate light
10. Back-up light
11. Rear combination light (stop/tail/side marker light)
12. Rear turn signal light
Fog may temporarily form inside the lens of the exterior lights in the rain or in a car wash. A temperature difference between the inside and the outside of the lens causes the fog. This is not a malfunction. If large drops of water collect inside the lens, contact a NISSAN dealer.
Replacing
Xenon headlight model:

 HIGH VOLTAGE
When xenon headlights are on, they
produce a high voltage. To prevent an
electric shock, never attempt to modify
or disassemble. Always have your xenon
headlights replaced at a NISSAN
dealer. For additional information, see
“Headlight and turn signal switch” in
the “2. Instruments and controls” section.
HIGH VOLTAGE
When xenon headlights are on, they
produce a high voltage. To prevent an
electric shock, never attempt to modify
or disassemble. Always have your xenon
headlights replaced at a NISSAN
dealer. For additional information, see
“Headlight and turn signal switch” in
the “2. Instruments and controls” section.
If replacement is required, see a NISSAN dealer.
Use the same number and wattage as originally installed:
Low beam:
Wattage: 35
Bulb no.: D2R
High beam:
Wattage: 60
Bulb no.: HB3
Halogen headlight model:
The headlight is a semi-sealed beam type which uses a replaceable headlight (halogen) bulb.

- Do not leave the bulb out of the headlight reflector for a long period of time. Dust, moisture, smoke, etc.
entering the headlight body may affect bulb performance.
- High pressure halogen gas is sealed inside the halogen bulb. The bulb may break if the glass envelope is scratched or the bulb is dropped.
- Only touch the plastic base when handling the bulb. Never touch the glass envelope.
- Aiming is not necessary after replacing the bulb. When aiming adjustment is necessary, contact a NISSAN dealer.
Use the same number and wattage as originally installed:
Low beam:
Wattage: 55
Bulb no.: H11
High beam:
Wattage: 60
Bulb no.: HB3
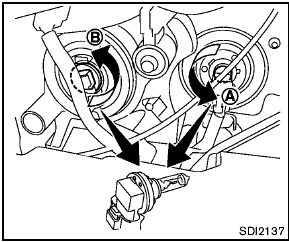
Disconnect the battery negative cable before replacing bulbs.
A High-beam bulb
B Low-beam bulb
See also:
Vacuum assisted brakes
The brake booster aids braking by using engine
vacuum. If the engine stops, you can stop the
vehicle by depressing the brake pedal. However,
greater foot pressure on the brake pedal will be
re ...
Trunk light
The light illuminates when the trunk lid is opened.
When the trunk lid is closed, the light goes off.
For bulb replacement procedures, refer to “Exterior
and interior lights” in the “Mainten ...
Driving It
The Sentra's off-the-line performance is good, with acceleration that's much
more effortless than the Civic or Corolla, both of which are offered with
traditional automatic transmissions with fixe ...