Automatic anti-glare rearview mirror
The inside mirror is designed so that it automatically dims during night time conditions and according to the intensity of the headlights of the vehicle following you. The automatic anti-glare feature is activated when the ignition switch is placed in the ON position.
Do not hang any objects over the sensors (1) or apply glass cleaner to the sensors.
Doing so will reduce the sensitivity of the sensors, resulting in improper operation.
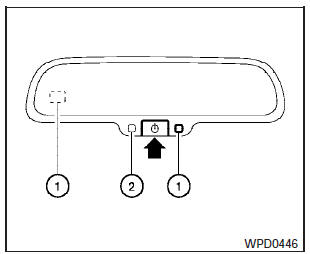
Type A
Type A
The indicator light (2)- will illuminate when the automatic anti-glare feature is operating.
With the ignition switch placed in the ON position,
press the  button as described:
- To turn off the anti-glare feature, press
the  button. The indicator light
will turn
off.
button. The indicator light
will turn
off.
- To turn on the anti-glare feature, press
the  button again. The indicator
light
will turn on.
button again. The indicator
light
will turn on.
For information on the compass display (if so equipped), see Compass display in the Instruments and controls section of this manual.
Type B-Without compass
Type B and Type C
The indicator light (2)- will illuminate when the automatic anti-glare feature is operating.
To turn off the automatic anti-glare feature, press:
- the  button for inside
mirrors without
compass.
button for inside
mirrors without
compass.
- the  button for inside mirrors
with
compass.
button for inside mirrors
with
compass.
The indicator light will turn off.
Type C-With compass
To turn on the automatic anti-glare feature again, press:
- the  button for inside
mirrors without
compass.
button for inside
mirrors without
compass.
- the  button for inside
mirrors with
compass.
button for inside
mirrors with
compass.
The indicator light will turn on.
Some vehicles are also equipped with automatic anti-glare outside mirrors. For additional information, see Automatic anti-glare outside mirrors in this section.
For information on HomeLink Universal Transceiver operation, see the HomeLink Universal Transceiver in the Instruments and controls section of this manual.
For information on the compass display (if so equipped), see Compass display in the Instruments and controls section of this manual.
See also:
Towing a trailer
Overloading or improper loading of a
trailer and its cargo can adversely affect
vehicle handling, braking and performance
and may lead to accidents.
- Do not tow a trailer or haul a hea ...
Rear power window switch (sedan
only)
The rear power window switches open or close
only the corresponding windows. To open the
window, push the switch and hold it down 1 . To
close the window, pull the switch up 2 . ...
Rear-facing child restraint installation using latch
Refer to all Warnings and Cautions in the Child
Safety and Child Restraint sections before installing
a child restraint.
Follow these steps to install a rear-facing child
restraint using the La ...