
Zone variation change procedure
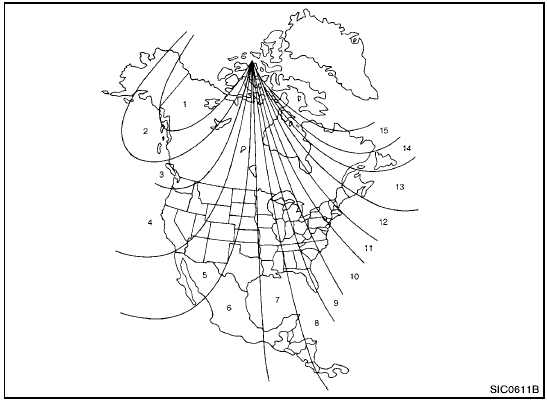
Zone map
The difference between magnetic north and geographical north is known as variance. In some areas, this difference can sometimes be great enough to cause false compass readings.
Follow these instructions to set the variance for
your particular location if this happens:
1. Push the  switch for more than 3
seconds. The current zone number will
appear in the display.
switch for more than 3
seconds. The current zone number will
appear in the display.
2. Find your current location and variance number on the zone map.
NOTE:
Use zone number 5 for Hawaii.
3. Push the switch repeatedly until the
new zone number appears in the display,
then release the switch. After you release
the switch, the display will show a compass
direction within a few seconds.
- If the compass deviates from the correct indication soon after repeated adjustment, have the compass checked at a NISSAN dealer.
- The compass may not indicate the correct compass point in tunnels or while driving up or down a steep hill. (The compass returns to the correct compass point when the vehicle moves to an area where the geomagnetism is stabilized.)

- Do not install a ski rack, antenna, etc., which are attached to the vehicle by means of a magnet. They affect the operation of the compass.
- When cleaning the mirror, use a paper towel or similar material dampened with glass cleaner. Do not spray glass cleaner directly on the mirror as it may cause the liquid cleaner to enter the mirror housing.
See also:
Cup holders
Front
Adjust the cup holder size by turning the adjustment
knob and sliding the cup holder divider to
the desired position.
● Avoid abrupt starting and braking when
the cup holder ...
Compressed Video Files (models with Navigation System)
Explanation of terms:
- DivX DivX refers to the DivXT codec
owned by Div, Inc. used for a lossy compression
of video based on MPEG-4.
- AVI AVI stands for Audio Video Interleave.
It is standard ...
Continuously Variable Transmission (CVT)
The ignition lock is designed so that the ignition
switch cannot be turned to the LOCK position
until the selector lever is moved to the P (Park)
position.
- When turning the ignition switch to ...