How to use the setup button
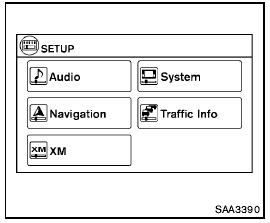
When the SETUP button is pushed, the Setup screen will appear on the display. You can select and/or adjust several functions, features and modes that are available for your vehicle.
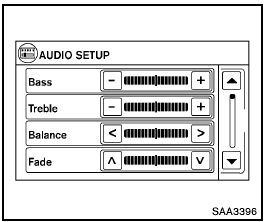
Audio setup
Push the AUDIO button to adjust the following items to the desired setting:
Bass, Treble, Balance and Fade:
Controls the sound of the audio system. Balance adjusts the sound between the left and right speakers. Fade adjusts the sound between the front and rear speakers.
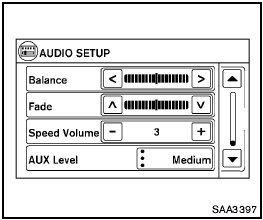
Speed Volume:
Controls the level to which the volume is adjusted as the vehicle’s driving speed changes.
Choose a setting between 1 and 5 or choose 0 to disable the feature entirely.
AUX Level:
Controls the volume level of incoming sound when an auxiliary device is connected to the system. Available options are Quiet, Medium and Loud.
Navigation setup
Refer to the separate Navigation System Owner’s Manual for information regarding this item.
XM setup
For XM setup, refer to “Audio system” later in this section.
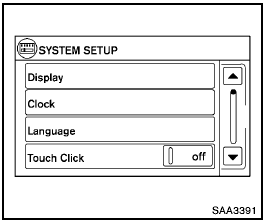
System setup
Select the “System” key to select and/or adjust various functions of the system. A screen with additional options will appear.
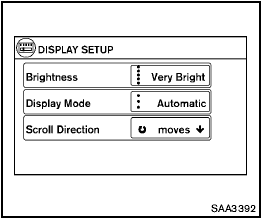
Display:
Select the “Display” key to adjust the appearance of the display. The following settings can be adjusted:
- Brightness:
The brightness of the display can be set to Very Bright, Bright, Default, Dark or Very Dark. Touch the “Brightness” key to cycle through the options.
- Display Mode:
The display can be adjusted to fit the level of lighting in the vehicle. Touch the “Display Mode” key to cycle through the options. “Day” and “Night” modes are suited for the respective times of day, while “Automatic” controls the display automatically.
- Scroll Direction:
The direction that menus scroll can be adjusted.
Choose either “up” or “down”.
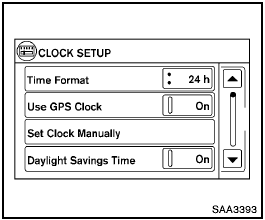
Clock:
Select the “Clock” key to adjust the time and the appearance of the clock on the display. The following settings can be adjusted:
- Time Format:
The clock can be set to 12 hours or 24 hours.
- Use GPS Clock:
When this setting is activated, the clock is set and continually updated via the GPS used by the Navigation System.
- Set Clock Manually:
When this setting is activated, the clock can be set manually. Touch the “+” or “−” key to adjust the hours and minutes up or down.
- Daylight Savings Time:
When this setting is activated, daylight savings time is on. Touch the “Daylight Savings Time” key to toggle the setting on or off.
- Time Zone:
Choose the applicable time zone from the list.
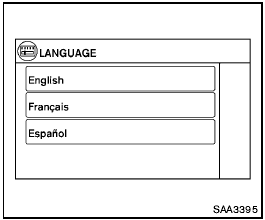
Language:
Select the “Language” key to adjust the language used by the system. The language can be set to English, Franc¸ ais or Espan˜ ol.
Touch click:
Select the “Touch Click” key to toggle the touch click feature on or off. When activated, a click sound will be heard every time a key on the screen is touched.
Beep tones:
Select the “Beep Tones” key to toggle the beep tones feature on or off. When activated, a beep sound will be heard every time a key on the screen is touched.
Reset all settings/memory:
Select the “Reset All Settings/Memory” key to return all settings to default and to clear the memory.
Traffic setup
Refer to the separate Navigation System Owner’s Manual for information regarding this item.
See also:
AWD warning light
The AWD warning light is located in the meter.
The AWD warning light illuminates when the
ignition switch is turned to the ON position. It
turns off soon after the engine is started.
If any ma ...
Selecting the correct oil
It is essential to choose the correct grade, quality
and viscosity engine oil to ensure satisfactory
engine life and performance. See “Capacities
and recommended fuel/lubricants” earlier in thi ...
Programming HomeLink
1. To begin, press and hold the two outer
HomeLink buttons (to clear the memory)
until the indicator light (1) blinks (after 20
seconds). Release both buttons.
2. Position the end of the hand ...