Precautions on booster seats
WARNING
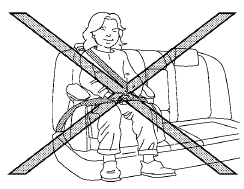
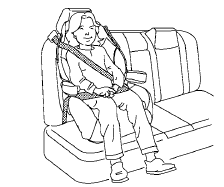
If a booster seat and seat belt are not used properly, the risk of a child being injured in a sudden stop or collision greatly increases:
– Make sure the shoulder portion of
the belt is away from the child’s face
and neck and the lap portion of the
belt does not cross the stomach.
– Make sure the shoulder belt is not
behind the child or under the child’s
arm.
– A booster seat must only be installed
in a seating position that has a
lap/shoulder belt.


Booster seats of various sizes are offered by several manufacturers. When selecting any booster seat, keep the following points in mind:
● Choose only a booster seat with a label certifying that it complies with Federal Motor Vehicle Safety Standard 213 or Canadian Motor Vehicle Safety Standard 213.
● Check the booster seat in your vehicle to be sure it is compatible with the vehicle’s seat and seat belt system.
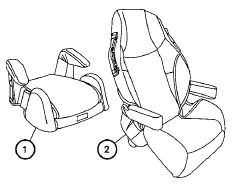
● Make sure the child’s head will be properly supported by the booster seat or vehicle seat. The seatback must be at or above the center of the child’s ears. For example, if a low back booster seat 1 is chosen, the vehicle seatback must be at or above the center of the child’s ears. If the seatback is lower than the center of the child’s ears, a high back booster seat 2 should be used.
● If the booster seat is compatible with your vehicle, place the child in the booster seat and check the various adjustments to be sure the booster seat is compatible with the child. Always follow all recommended procedures.
All U.S. states and Canadian provinces or territories require that infants and small children be restrained in an approved child restraint at all times while the vehicle is being operated.
The instructions in this section apply to booster seat installation in the rear seats or the front passenger seat.
See also:
Safety
All-disc antilock brakes with electronic brake-force distribution and brake
assist are standard. Side-impact airbags and side curtain-type airbags that
protect outboard occupants in all three rows ...
Supplemental air bag warning
light
When the ignition switch is placed in the ON or
START position, the supplemental air bag warning
light illuminates for about 7 seconds and then
turns off. This means the system is operational.
I ...
CD care and cleaning
CD care and cleaning
● Handle a CD by its edges. Do not bend the
disc. Never touch the surface of the disc.
● Always place the discs in the storage case
when they are not being use ...
