
Programming HomeLink
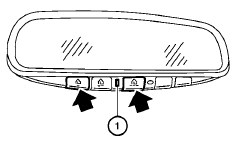
1. To begin, press and hold the two outer HomeLink buttons (to clear the memory) until the indicator light 1 blinks (after 20 seconds). Release both buttons.
2. Position the end of the hand-held transmitter 1 - 3 inches (26 - 76 mm) away from the HomeLink surface.
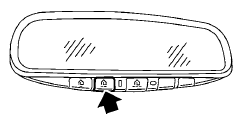
3. Using both hands, simultaneously press and hold both the HomeLink button you want to program and the hand-held transmitter button. DO NOT release the buttons until step 4 has been completed.
4. Hold down both buttons until the indicator light on the HomeLink flashes, changing from a “slow blink” to a “rapidly flashing blink”. This could take up to 90 seconds. When the indicator light flashes rapidly, both buttons may be released. The rapidly flashing light indicates successful programming. To activate the garage door or other programmed device, press and hold the programmed HomeLink button — releasing when the device begins to activate.
5. If the indicator light on the HomeLink blinks rapidly for 2 seconds and then turns solid, HomeLink has picked up a “rolling code” garage door opener signal. You will need to proceed with the next steps to train the HomeLink to complete the programming which may require a ladder and another person for convenience.
6. Press and release the “smart” or “learn” program button located on the garage door opener’s motor to activate the “training mode”. This button is usually located near the antenna wire that hangs down from the motor. If the wire originates from under a light lens, you will need to remove the lens to access the program button.
NOTE:
Once you have pressed and released the program button on the garage door opener’s motor and the “training light” is lit, you have 30 seconds in which to perform step 7. Use the help of a second person for convenience to assist when performing this step.
7. Within 30 seconds of pressing and releasing
the garage door opener’s program button,
quickly and firmly press and release the
HomeLink button you’ve just programmed.
Press and release the HomeLink button up
to 3 times to complete the training.
8. Your HomeLink button should now be programmed.
(To program the remaining
HomeLink buttons for additional door or
gate openers, follow steps 2-4 only.)
NOTE:
Do not repeat step 1 unless you want to “clear” all previously programmed HomeLink buttons.
If you have any questions or are having difficulty programming your HomeLink buttons, refer to the HomeLink web site at: www.homelink.com or call 1-800-355-3515.
See also:
Others settings
Select the “Others” key. Comfort settings, language
and units and Voice Recognition settings
will be displayed.
Comfort settings
Select the “Others” key, then select the “Comfort”
...
Window washer fluid
Type A
Type B
Fill the window washer fluid reservoir periodically.
Add window washer fluid when the low
window washer fluid warning light illuminates (if
so equipped).
To fill the window w ...
Memory storage function
Two positions for the drivers seat, steering column,
and outside mirrors can be stored in the
automatic drive positioner memory. Follow these
procedures to use the memory system.
1. Set the C ...