Display settings
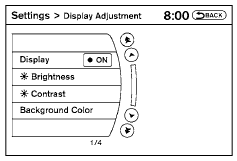
Select the “Display” key. On the screen above, select the “Display Adjustment” key. The Display Adjustment screen will appear.
Brightness/contrast:
Select the “Brightness” key or the “Contrast” key to adjust the brightness or contrast of the display background. Touch the “+” or “-” key to adjust the brightness to darker or brighter and the contrast to lower or higher.
The new settings are automatically saved when you exit the setting screen by selecting the “Back” key or any other mode button.
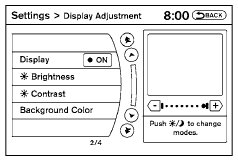
Display off:
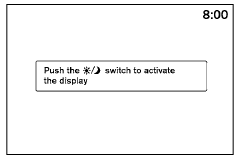
Select the “Display ON” key. The indicator of the “Display ON” turns off and the message above will be displayed briefly. When the audio, HVAC (Heater and air conditioner), or any mode button on the control panel is operated, the display turns on for that operation. If one of the control panel buttons is pressed, the display will not automatically turn off until that operation is finished. Otherwise, the screen turns off automatically after 5 seconds.
To turn the screen on:
● Press the SETTING button and select the “Display” key and then select the “Display ON” key, or
● Press the  button and the
message
“resuming display” will appear and the “Display
ON” key will be automatically turned on
(no amber indicator).
button and the
message
“resuming display” will appear and the “Display
ON” key will be automatically turned on
(no amber indicator).
Background color:
Select the “Background Color” key; the display color changes between day and night. The new settings are automatically saved when you exit the setting screen by selecting the “Back” key or any other mode button.
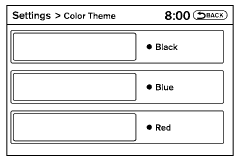
Color theme:
Select the “Display” key, then select the “Color Theme” key. The Color Theme select screen will appear.
Select the key for the desired color. The appearance of the background, arrows and bars will change for all screens accordingly. You can choose a black, blue or red color theme.
See also:
Front and rear view
Guiding lines, which indicate the vehicle width
and distances to objects with reference to the
vehicle body line A , are displayed on the
monitor.
Distance guide lines:
Indicate distances from ...
Interior trunk access
The trunk can be accessed from the passenger
side of the rear seat for loading and unloading, as
shown.
1. Open the access cover on the rear parcel
shelf.
2. Push down on the button on the rear p ...
Push-button ignition switch positions
LOCK (Normal parking position):
The ignition switch can only be locked in this
position.
The ignition switch will be unlocked when it is
pushed to the ACC position while carrying the
Intellige ...