Clock
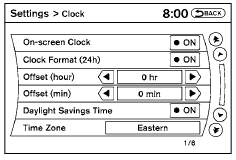
The following display will appear after pressing the SETTING button, then selecting the “Clock” key.
On-screen Clock:
When this item is enabled (indicator light illuminated), a clock is always displayed in the upper right corner of the screen.
This clock will indicate the time almost exactly because it is always adjusted by the GPS system.
Clock Format (24h):
When this item is enabled (indicator light illuminated), the clock format will change from the default 12-hour display to a 24-hour display. Offset (hour):
Adjust the time by increasing or decreasing the hours.
Offset (minute):
Adjust the time by increasing or decreasing the minutes.
Daylight Savings Time:
When this item is enabled (indicator light illuminated), daylight savings time is on. To turn off the daylight savings time, touch the “ON” key; the amber indicator light will go out.
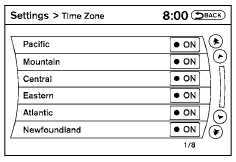
Time Zone:
Select the “Time Zone” key; the Time Zone screen will appear.
Select one of the following zones, depending on the current location, by selecting the correct time zone key to enable that time zone (indicator light will illuminate for that location).
● Pacific
● Mountain
● Central
● Eastern
● Atlantic
● Newfoundland
● Hawaii
● Alaska
After selection/settings, select the “Back” key or any other mode button to accept the changes.
See also:
Inside the vehicle
The maintenance items listed here should be
checked on a regular basis, such as when performing
periodic maintenance, cleaning the vehicle,
etc.
Additional information on the following
items ...
Safety
The Nissan Rogue gets top safety marks. It was named a 2009 Top Safety Pick
by the Insurance Institute for Highway Safety. To receive this award, a car must
earn the top rating of Good in frontal, ...
Backing up near a projecting object
Backing up near a projecting object
The vehicle may seem to nearly clear the object
in the display. However, the vehicle may hit the
object if it projects over the actual backing up
course. ...